DIY and Hand-Paint Your Little You 3D Character at Home
- Christina Guo

- Feb 23
- 3 min read
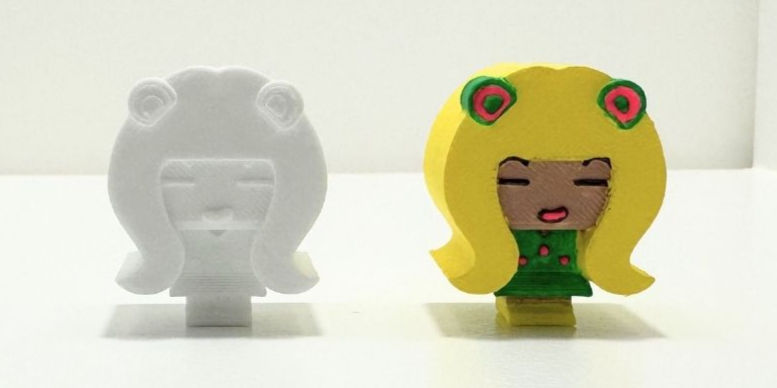
There’s something magical about bringing a digital character into the real world, especially when you do it yourself. Recently, I ran a fun experiment: I 3D printed a Little You 3D character using a Bambu A1 Mini Combo in plain white, then hand-painted it in full color. The result? Surprisingly professional and incredibly satisfying! If you’ve ever been curious about DIY 3D printing and painting, this is your sign to give it a try.
My Step-by-Step Process
1. Download the 3D Model
I started by exporting my Little You 3D character model. Many users don’t realize that you can download any 3D model you created on Little You 3D and print it at home using your own desktop printer. To learn how to download a 3D model on Little You 3D, visit our blog post, "Print Little You 3D Models at Home: A Guide for Educators and Hobbyists".
Tip: Since Little You 3D specializes in full-color 3D printing, your downloadable files will be in OBJ and MTL formats so you can see all the rich colors you’ve added. When printing on most desktop printers, be sure to convert your file to STL format first.
2. Print on a Desktop 3D Printer

I used standard white PLA filament and typical settings:
Layer height: 0.12–0.16 mm
Infill: 10–15%
Supports: enabled (for detailed parts)
The print came out clean and smooth, perfect for painting.
3. Light Sanding & Proper Prep
Before painting, I did some quick finishing:
Lightly sanded the layer lines
Removed support marks
Wiped the model clean
This prep step makes a huge difference. Painting PLA isn’t just about brushing on color, proper surface preparation helps the paint stick better and look more professional.
Pro tip: Sandpaper is one of the most effective and affordable ways to smooth PLA prints and remove surface inconsistencies.
Recommended Extra Step: Priming
If you want an even more polished result, consider adding a primer before painting.
Primer fills tiny gaps and smooths the remaining texture
It creates a better bonding surface for paint
Most PLA prints benefit from at least two coats of primer
Priming significantly improves paint adhesion and overall finish quality. After priming, make sure the surface is fully dry before moving to paint.
4. Hand-Paint the Character 🎨
This was the most fun part!
What I used:
Acrylic paints
Fine detail brushes
Optional sealer spray to protect the color
Acrylic paint is especially popular for PLA because it’s easy to use, water-based, and dries quickly.


Painting order that worked well:
Skin tones first
Clothing colors
Small details (eyes, logos, etc.)
Final protective seal
You can print in any base color, but I chose white because it makes the colors more vibrant and easier to layer.
Detail tip: Hand painting is ideal for toys and miniature figures where fine details matter most.
Optional: Clear Coat Protection
Once you’re happy with the colors, adding a clear coat can protect your model and enhance the finish (matte or glossy). A clear coat acts as a protective layer against scratches and wear.
The Final Result
Honestly, it looked better than expected. The combination of desktop printing and hand painting gives your Little You 3D character a handcrafted, collectible feel that’s hard to replicate with mass production. Each piece becomes uniquely yours.
Why You Should Try This at Home
DIY printing your Little You 3D character is:
Creative and educational
Great for classrooms and families
Perfect for personalized gifts
A fun weekend project
A great way to learn 3D printing basics
You don’t need an industrial printer, just a standard desktop machine and some paint.
Ready to Make Your Own?
If you’ve created a character on Little You 3D, take the next step:
Download your 3D model
Print it at home in white
Sand and (optionally) prime
Paint it your way
Share your masterpiece with us
There’s nothing quite like holding a character you customized and finished yourself. We’d love to see your creations, tag us and show off your painted characters! 🎉


Comments